- Support
- How to Set Up a VPN on Windows
- windows 8+ (8, 8.1, 10 and higher)…
Windows 8+ (8, 8.1, 10 and higher) Manual L2TP setup
Setting up L2TP manually with Windows®
a. Click Windows® “Start” button
b. Click Settings
c. Click Network & Internet
d. Click VPN from the left menu
e. Click Add a VPN connection
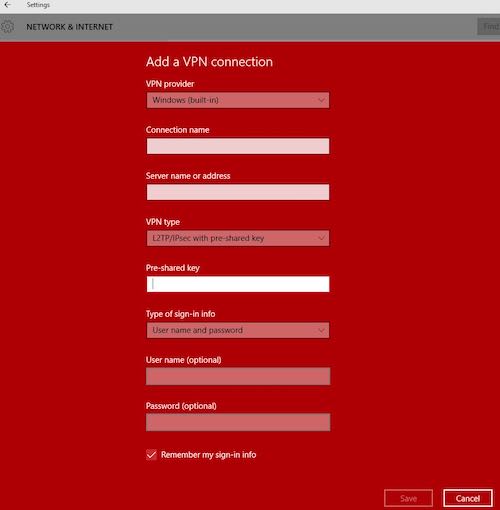
f. Fill in the fields with the following:
- VPN Provider: Windows (built-in)
- Connection Name: You may name it anything you wish – This is just a label. (Example: “Super Secure L2TP VPN”.)
- Server name or address:
[Click “L2TP Server Locations” below, for a list of options.
Type the server name for the city you select, into the Server name or address box.]L2TP Server Address Locations
North America L2TP VPN Gateway
l2tp.atlanta.witopia.net
l2tp.baltimore.witopia.net
l2tp.boston.witopia.net
l2tp.chicago.witopia.net
l2tp.denver.witopia.net
l2tp.dallas.witopia.net
l2tp.kansascity.witopia.net
l2tp.lasvegas.witopia.net
l2tp.longbeach.witopia.net
l2tp.losangeles.witopia.net
l2tp.miami.witopia.net
l2tp.mexicocity.witopia.net
l2tp.montreal.witopia.net
l2tp.redding.witopia.net
l2tp.newark.witopia.net
l2tp.newyork.witopia.net
l2tp.phoenix.witopia.net
l2tp.portland.witopia.net
l2tp.redding.witopia.net
l2tp.sanfrancisco.witopia.net
l2tp.seattle.witopia.net
l2tp.washingtondc.witopia.net
l2tp.vancouver.witopia.netEurope L2TP VPN Gateways
l2tp.amsterdam.witopia.net
l2tp.barcelona.witopia.net
l2tp.berlin.witopia.net
l2tp.brussels.witopia.net
l2tp.bucharest.witopia.net
l2tp.budapest.witopia.net
l2tp.copenhagen.witopia.net
l2tp.dublin.witopia.net
l2tp.frankfurt.witopia.net
l2tp.helsinki.witopia.net
l2tp.lisbon.witopia.net
l2tp.london.witopia.net
l2tp.madrid.witopia.net
l2tp.milan.witopia.net
l2tp.mumbai.witopia.net
l2tp.newdehli.witopia.net
l2tp.oslo.witopia.net
l2tp.paris.witopia.net
l2tp.riga.witopia.net
l2tp.rome.witopia.net
l2tp.stockholm.witopia.net
l2tp.vienna.witopia.net
l2tp.warsaw.witopia.netAsia/Pacfic L2TP VPN Gateways
l2tp.auckland.witopia.net
l2tp.bangkok.witopia.net
l2tp.melbourne.witopia.net
l2tp.seoul.witopia.net
l2tp.singapore.witopia.net
l2tp.sydney.witopia.net
l2tp.tokyo.witopia.netPowered by HTML5 Responsive FAQ - VPN Type: L2TP/IPsec with pre-shared key
- Pre-Shared key: witopia1
- Type of sign-in info: Username and Password
- Username: Enter your VPN Username*. This will usually be Your Email Address with “W\” in front.
(example: W\johnsmith@gmail.com)
If your username ends in “@witopia”, then do NOT add “W\”, nor “.net”.
* You can always check your username, or reset your VPN Password by logging into your account HERE - Password: Enter the VPN password you selected when you activated. (NOTE: This may be different than the website password.)
- Remember my sign-in info: Checked
Your setup will look similar to this:
g. Click Save
Your VPN is set up and ready to be connected!
Connecting and disconnecting your VPN
To connect and disconnect your manual VPN connection is simple with a couple of clicks.
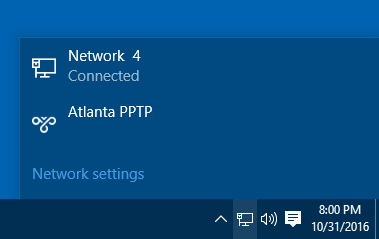
a. Locate the wired or wireless network icon in the bottom left corner of your taskbar.
Windows® may hide icons. If so click the arrow in the task bar to reveal the hidden icons.
b. Click the network icon to show options
c. Click the VPN profile name
This may bring up the Settings -> Network -> VPN page. If so, that is OK.
d. Click connect
To disconnect, do the same steps, just click disconnect
e. Enjoy!
Have more questions? Let us know how we can help you.


