- Support
- How to Set Up a VPN on Mac
- osx/macos ikev2 ipsec vpn setup
osx/macos ikev2 ipsec vpn setup
Setting up IKEv2 IPSec
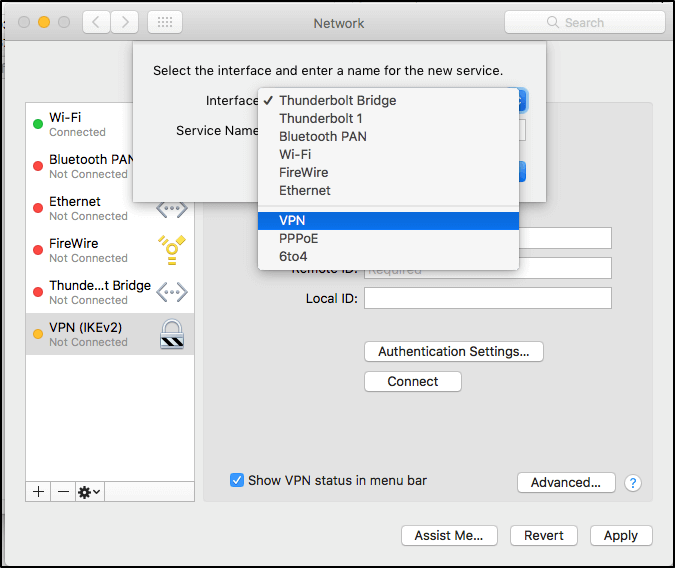
- Click on the Apple Icon -> System preferences > Network
- Click the plus sign “+” to add a connection
- For ‘Interface’, select VPN
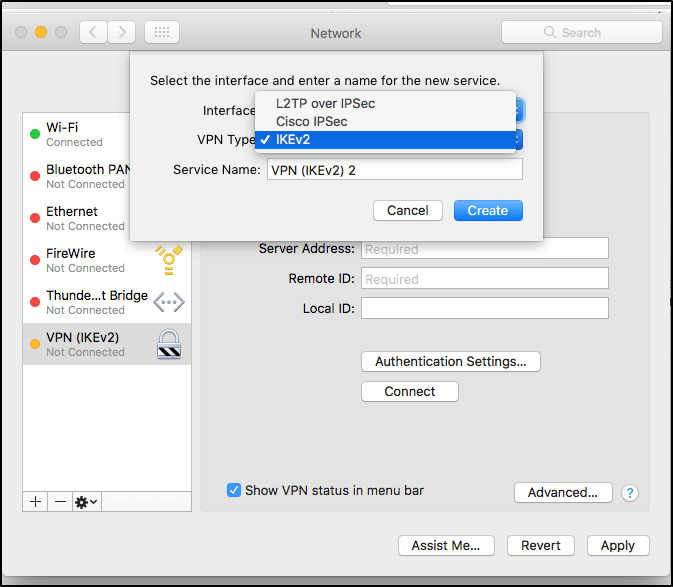
- For “VPN type” select IKEv2
- Enter a Service Name (can be any name you want, this is for your ease of managing vpn profiles)
- Select the connection you just created, on the left-hand side, and enter the following details:
- Server (you can choose any location):
IPSec Server Location Addresses
USA IPSec VPN Gateways
ipsec.atlanta.witopia.net
ipsec.baltimore.witopia.net
ipsec.boston.witopia.net
ipsec.chicago.witopia.net
ipsec.dallas.witopia.net
ipsec.denver.witopia.net
ipsec.kansascity.witopia.net
ipsec.losangeles.witopia.net
ipsec.lasvegas.witopia.net
ipsec.miami.witopia.net
ipsec.newark.witopia.net
ipsec.newyork.witopia.net
ipsec.phoenix.witopia.net
ipsec.portland.witopia.neta
ipsec.redding.witopia.net
ipsec.sanfrancisco.witopia.net
ipsec.seattle.witopia.net
ipsec.washingtondc.witopia.netCanada IPSec VPN Gateways
ipsec.montreal.witopia.net
ipsec.toronto.witopia.net
ipsec.vancouver.witopia.netCentral/South America IPSec VPN Gateways
ipsec.mexicocity.witopia.net
Europe IPSec VPN Gateways
ipsec.amsterdam.witopia.net
ipsec.barcelona.witopia.net
ipsec.berlin.witopia.net
ipsec.brussels.witopia.net
ipsec.bucharest.witopia.net
ipsec.budapest.witopia.net
ipsec.copenhagen.witopia.net
ipsec.dublin.witopia.net
ipsec.frankfurt.witopia.net
ipsec.helsinki.witopia.net
ipsec.lisbon.witopia.net
ipsec.london.witopia.net
ipsec.luxembourg.witopia.net
ipsec.madrid.witopia.net
ipsec.milan.witopia.net
ipsec.moscow.witopia.net
ipsec.mumbai.witopia.net
ipsec.oslo.witopia.net
ipsec.paris.witopia.net
ipsec.prague.witopia.net
ipsec.riga.witopia.net
ipsec.reykjavik.witopia.net
ipsec.stockholm.witopia.net
ipsec.vilnius.witopia.net
ipsec.warsaw.witopia.net
ipsec.zurich.witopia.netAfrica/Middle East IPSec VPN Gateways
ipsec.jerusalem.witopia.net
ipsec.johannesburg.witopia.netAsia IPSec VPN Gateways
ipsec.bangkok.witopia.net
ipsec.hongkong.witopia.net
ipsec.kualalumpur.witopia.net
ipsec.newdelhi.witopia.net
ipsec.singapore.witopia.net
ipsec.seoul.witopia.net
ipsec.tokyo.witopia.netOceania IPSec VPN Gateways
ipsec.auckland.witopia.net
ipsec.melbourne.witopia.net
ipsec.sydney.witopia.netPowered by HTML5 Responsive FAQ - Remote ID: ipsec.witopia.net
- Local ID: [Leave this blank]
- Server (you can choose any location):
- Click Authentication Settings, and set the following:
- Authentication type: Username
- Username: [Your VPN username]
- Password: [Your VPN password]
- Click OK
There are two potential formats for your vpn username. You must use the one you selected when you activated your service. If you do not remember, you can log in to your account on our website here here and under your active service it says “USERNAME”. This is your VPN username.
#1: Your email = W\your@email.com
#2: WiTopia username = username@witopiaYou MUST use a Capital W with a backslash “\” if your vpn username is an email.
If you have a username ending in “@witopia” then you do *not* use W\ before the username or “.net” after the username/blockquote>
Click Apply
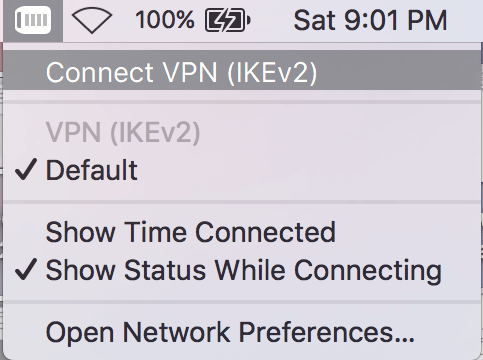
Be sure the “Show VPN status in menubar” option is checked for easier connect and disconnect
Your vpn is set up! You can connect and disconnect the VPN as needed./p>
Connecting and Disconnecting IKEv2 IPSec VPN
1. Click on the VPN icon in the menubar and select the VPN profile you want to connect to.
2. The icon will change from full black to a white center when connected.
3.To disconnect click the menubar icon and choose disconnect
Have more questions? Let us know how we can help you.


